I’ve wanted to implement some kind of Path Tracer for a while now, but didn’t get around to it until the other day. As per usual, let’s start by showing the finished product, then we’ll get into explaining the general technique and how it differs from my past works, then talk about how I’ve actually implemented things.
I should note that what I’ve done here is an exceptionally simple version of Monte Carlo path tracing. I don’t do Metropolis Light Transport or anything especially fancy like that (though I may try to later). Very similarly to ray tracing, for each pixel I shoot one ray out into the scene, bounce it some number of times and report back that accumulated colour. Where this differs from strict ray tracing is that I don’t just do this once per pixel, and where it differs from my previous distributed ray tracing approach is that it doesn’t have to collect all its samples at once. Every frame I trace one random ray per pixel into the scene, as before, and then I accumulate the value in a texture. Every frame I divide my accumulated value by the number of frames my render has been running.
Specifically, the Monte Carlo portion of that definition means that we probabilistically choose every step of our ray propagation, giving us glossy reflections, depth of field, soft shadows, supersampling, etc… essentially for free. We can start by randomly selecting a point on our lens to project from, and at each intersection randomly choose to reflect or absorb the ray, and randomly perturb each shadow ray. Since we’re randomly doing this every frame and accumulating our results, we don’t need to be concerned about noise or strange outliers as they will eventually smooth themselves out. Here’s some code samples showing the probabilistic sampling, and how we accumulate the result.
Probabalistic choice:
vec3 castRay(Ray ray, int levels){
...

// Do Phong reflection model
if (tMin < 9999.0){
    dcol = phongLight (ray, ray.ro + tMin *ray.rd, hitNorm, hitM);
    ray.ro = ray.ro + tMin *ray.rd;
    float odds = rand(vec2(cos(iTime * 1.4) * 5.4, 1.3));
    if (odds < hitM.ks.x){ // if we decide to do spec reflection
        vec3 refDir = reflect(ray.rd, hitNorm);
        ray.rd = refDir;
    }else{ // if we decide to do diffuse
	float r1 = rand(vec2(0.2 + sin(iTime * 4.2 + 0.2), -1.3));
        float r2 = rand(vec2(1.2, 4.3));

        ray.rd = vec3(cos(2. * PI * r1) * sqrt(1. - (r2 * r2)),
                      sin(2. * PI * r1) * sqrt(1. - (r2 * r2)),
                      r2);
    }
}else{
    if ( j == 0 ){ fcol = vec3(0.0);}
        else { break;}
    }
...
}
Note that we don't try and get multiple samples, we simply pick something and run with it for now, knowing that if we've chosen an unlikely path the law of large numbers will eventually make our image converge.
Accumulation:
void mainImage( out vec4 fragColor, in vec2 fragCoord )
{
    initScene();

    eye.xy += (iMouse.xy - 0.5 * iResolution.xy);
    vec2 uv = fragCoord.xy / iResolution.xy - vec2(0.5);
    vec2 size = iResolution.xy;

    vec4 col = texture( iChannel0, fragCoord/iResolution.xy ).xyzw;

    ...

    col.xyz += castRay(ray, 10);
    fragColor = vec4( col );
}
This means a few things. First, and most obviously is that these renders will improve as they continue to run. At frame one we only have one random ray's worth of information, but after a few seconds we have hundreds, allowing us to generate pretty nice looking global illumination, soft-shadows, etc...
Secondly, this implementation isn't very good for any kind of animation. The main benefit of how I'm doing this is that detail is created by running for longer and longer. If you include an animation one of two things will happen: you won't clear the buffer texture creating an entirely inaccurate smear throughout your image, or you will and you'll be left with a much noisier image. Of course, there are ways to mitigate this by playing with the refresh rate or using de-noising techniques, but for this simple tracer I've used no such thing. Here's an example of what I mean with smearing:

Thirdly, this strategy is as performant as my original pure ray tracing, but will generate even better images than my distributed ray tracer after it converges (read: denoises itself by obtaining enouch samples). This is because we only trace one ray per pixel, unlike the exponential amount of rays we trace in distributed ray tracing, and we also trace an unbounded amount of samples over time. My simple scene converges in about three seconds and runs at 20FPS when fullscreened on my laptop, as opposed to the performance of my previous Into to Computer Graphics project, which took minutes to render a comparable scene.
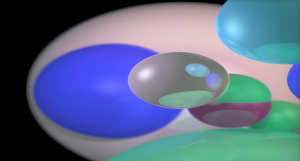
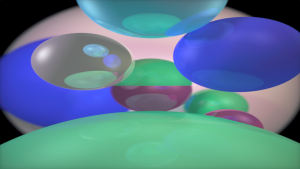
Just for kicks, here are a few screenshots of renders I've taken: